
Authentise is excited to announce our new Model Library! The model library feature allows you to store and curate common designs so that they are easily accessible for future use. This feature will make the order workflow more intuitive as it resembles a familiar online shopping experience. Users will be able to browse a gallery of model renders that can be easily selected and ordered. Without further ado, let's see how it looks!
Model Library
Found within the Manage dropdown, the Model Library page will allow you to curate your individual Model Library. This library is generally used to store your Bureau's most common designs. This will allow them to be easily accessible while creating new orders. You could also use it to display previously manufactured designs or to show customers examples of what can be built. The model library holds two types of models: Products and Specimens.

Adding a model to the Model Library
There are two ways to add a model to the Model Library.
Note: Specimens can only be added to the Model Library using Method 1.
Method 1: Adding Models within the Model Library Page
To add a model from the Model Library Page, click the Add Model to Library Button.

Every model requires a model Name. As mentioned above, there are two Types of models that can be uploaded to the Authentise MES: 1) Specimens and Product.
Note: Type cannot be changed once a model is Saved to the library.
Adding a Specimen model
Click the Type drop-down and select Specimen. Specimens, also known as coupons or test pieces, are generally produced for quality assurance, testing, or one-offs. For more information on setting up specimen workflows, read the Workflows article.

Notes can be added to describe any notable characteristics of the Specimen model. These notes are only visible within the Model Library and are for reference only.
Adding labels: Single OR multiple Labels can also be assigned to the model which enables grouping and organizing models in the library. To filter labels, click on the drop-down and start typing the label name. If the label does not exist, type in the desired <label name> click Add <label name> in the drop-down. This will create a new label for use in the Authentise MES system.
To upload the 3D model file, click the Choose Model File and select the 3D file from your Computer's directory. STL format is the default format support. For more information file conversion types supported, see File Conversion File Types. Click Save to continue.
Adding a Product model
Click the Type drop-down and select Product.

Selecting the Product type allows you to input additional additive processing information including:
Layer Thickness: You can indicate a specific layer thickness or layer height for the part. It is important to consider the machine capabilities/tolerances before specifying a layer thickness.
Base Material: The primary print material that the 3D piece will be printed with.
Support Material: Indicating a specific type of support structure material. Select None if not applicable.
Workflow: A specific workflow process can be indicated for each 3D print. For more information on how to enable and fully utilize workflow, read the Workflow Article.
Notes: Additional production notes can be saved for a specific part and referenced over time.
Labels: See the description above for how labels work.
Saving these parameters in the model library will save you time in the order preparation process, especially for repeat parts/orders.
To upload a CAD file, click the Choose Model File button and select a file from your computer. For more information on supported 3D file types and conversions, see File Conversion File Types. Once the 3D model has been uploaded, click Save to continue.
Method 2: Adding Product Models directly from within an Order
To add a 3D model to the library directly from within the order, click the Add to Model Library button. This will create a new object in the Model Library containing all of the parameters of the original Line Item. The name of the newly created object will reference the short UUID of the Line Item that it was created from.
Note: Models added this way are added to the Model Library as a Product. This type cannot be edited.

Using the Model Library while creating an Order
Creating an order with the Model Library offers the most stunning display of its utility. The opportunity to display curated models to customers makes creating an order within Authentise even more accessible. Users can now visually review a catalog of models that have already been reviewed, rather than having to supply their own models. The possible uses are numerous and we are excited to hear about how our customers choose to deploy this feature!
Restricted User Ordering Workflow
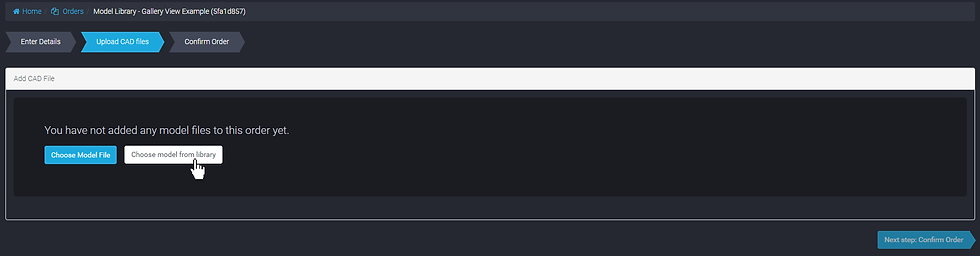
Restricted users also have the ability to access the Service Bureau's model library. After initiating a new order and entering order details, a restricted user will now have the option to upload model files or select a model from the library.

To browse available parts within the model library, click the "choose model from library" button.
A popup menu will appear with available parts to order. To add a CAD file to your order, click the object.

The restricted user will now be prompted to fill in additional details about the part(s) they are ordering. The specific details that are able to be specified will vary for each bureau.
Please contact support@authentise.com if you would like your restricted users to see additional fields. To continue, click the Save CAD File button.

The restricted user can continue to add additional CAD part line items. When the order is ready for final review and submission, click the "Next step: Review Order" button.

The Order is automatically submitted for review by the manufacturing bureau. The restricted user has the option to edit the order details, create a new order or return to the main Orders page.
Look how easy that was! Please let us know what you think of the Model Library! Our customer success team would love to hear from you by emailing info@authentise.com.
Comments