
This document will help you get started with the platform’s functionalities, in particular, the order creation process all the way to scheduling runs and looking at traceability reports. There's a short summary and a longer version for more detail. This Guide is intended to get you started, not to be comprehensive. Look around the other guides (especially the Setup Guide, if that's what you're after) and the platform itself for more details. To review supported browsers and operating systems for the app, please look here.
Summary
To summarize the process, here are the 6 key steps to creating an Order and scheduling a Run within the Authentise platform:
Click on Add Order on the Dashboard landing page.
Input all details relative to the order and upload your CAD models as Line Items. Click Save Order.
Review production estimates, adjust any Line Item parameters and set the Line Item status to Confirmed. Click on Save CAD File.
Go to Plan > Run and click on Add Run.
Select the printer specified in the part’s workflow, then select the prints that are to be manufactured in this printing run. Click Add Prints. To complete the run, click on Save Run.
When the Run estimates are processed, it will automatically schedule the earliest time available in the queue/Gantt Chart. You can also schedule the Run manually by clicking Manually Schedule or set it up as the next print by clicking Schedule As Next Print.
You have now created the Order and the Run attached to it! You can visualize all the steps of the Run, which are dictated by the part’s workflow, in the Work > Queues page (GANTT Chart).
Walkthrough Guide
Let’s get into the details of what the workflow actually looks like:
Login
Opening the platform, you’ll find yourself on the login page. Go ahead and input the email and password with which you’re registered and click “Log In”.

Dashboard/Add Order
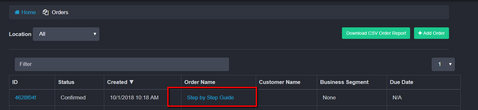
You should now have landed on the Dashboard page. To initialize your first order, click on the Add Order button.

New Order
This is the order creation page, or New Order page, as you can see in the breadcrumbs header below the menus. Here you can initialize the business details of your order, which will then be reported in every piece of documentation going forward and drive much of the automated messaging. Nothing apart from the Order Name is required for the order to be finalized at this point, as you’ll be able to add and modify information whenever you like. These fields can be filled automatically by connecting with our API endpoints to other software systems or your website. Here is an example of interoperability to other hardware and software systems. Once you are done adding the order’s details, proceed by clicking on the Save Order button on the top right.

New Line/CAD Item
We’ve now created the order itself. After clicking the Save Order button you’ll find yourself in that specific Order Page, where you’ll see a summary of the details you added previously. From here, you can add or modify that data anytime you want. Now that we have the bare skeleton of an order, let’s add some parts to it. At the bottom of the page, you’ll see the Add CAD File section. By clicking on the Choose Model File button you can upload your CAD file to the platform and append it to this order. The lines below contain crucial information that will drive the part’s estimates in terms of production time and cost. By choosing a workflow template, you will determine the printer, post-processing steps, and if included in the workflow template also the shipping type. When you have filled in the details, click on Add CAD File to proceed.

CAD file will render with details (material type, workflow, etc..)

To show 3D render of file click on the thumbnail:

Review Order
Once the file has been uploaded and the platform has processed it (this may take a page reload for large files), you’ll be able to review the newly added Line Item below the order summary. This includes a render of the CAD model, estimates of the printing time and cost as well as all the details we previously added to the part. The first thing to confirm is that the uploaded model is deemed serviceable by the platform in the Printable line. After that, take a look at the Estimates tab on the left. The estimates you see take into account the variables we’ve set in the last step: material, support material, quantity, layer thickness, model units, and ultimately the chosen workflow as it will not only include the printer details but also the post-processing steps. Review the estimates carefully as they can reveal mistakes in the variables’ setup. Once you are confident with the results and ready to push the line item into production, change the status to Confirmed and click on Save CAD File.
IMPORTANT: CAD files can NOT be scheduled for runs unless their status is "Confirmed"

New Run
To create a Run for your newly created Order, go back to the Dashboard by clicking on the header on the top left (it will be named as your bureau), or the Home link, and then clicking on Add Run.

Create Run
The Run Creation page will be empty at first, except for the Select Printer section. This dropdown will list the printers that have been added to your inventory. Click a printer that is of the same printer type as was specified in the workflow for the desired order’s line item. If you want to go back to your order and double-check what workflow you chose for your order, please click on Plan>Orders in the header. Tip: open the Order page in a new tab to easily toggle between these pages.


Scroll down to your CAD File and review what workflow you have chosen.

In case you want to dive deeper into the workflow steps, open the selected workflow by clicking on the Go link.

Back to our attempt to create a build and scheduling the entire workflow's runs. Go back to the Add Run page or open it again from the Dashboard.
After you have clicked on a printer, the Select Prints section will populate with all of the parts whose workflow includes a printing step with the selected printer's type. Add the prints you’d like to include in this printing run by selecting them in the Select Prints list and then clicking Add Prints. Note: This is a multi-select list so you can use the Shift and CTRL keys to select multiple prints before clicking Add Prints. You can also drag & drop the chosen parts to the Order column header on the Build Plate section. They will now be moved to the right, in the Build Plate section, with size information and the percentage of printing bed fill for each. To finalize the run, click on Save Run.

Review Run
After the system has finished processing the Run (the Status field will change from Calculating to Queued) you can review the production Estimates on the left. The system scheduled the build and any subsequent post-processing and shipping steps to the earliest available time slot. You can also choose to do it manually through the Manually Schedule button or let the system set it up as the next print in the queue with the Schedule As Next Print button. You may also export the packed build files, as an STL or 3MF, by clicking their hyperlinks. These can be loaded into your print prep software to ease with build prep. Do not forget to reupload any tweaked build models so that the system has the final file on record!

GANTT Chart
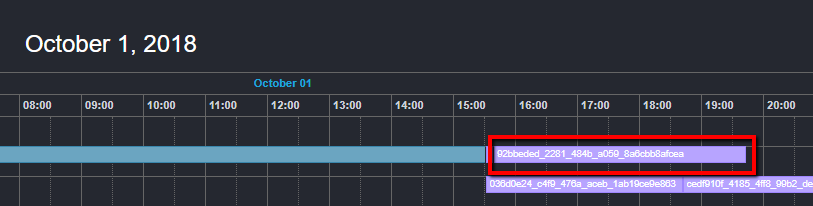
Now the Run has been scheduled and will be displayed on the Queues page (your GANTT chart). To see it, go to the Work header and then select Queues.

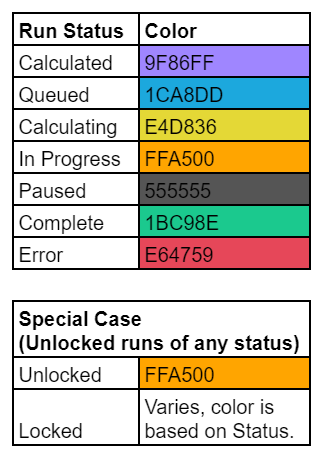
The colors of runs in the GANNT chart are as follows:
Travelers (standard and QR)
To access your travelers go into an order's line item and find:
1. Standard A4 Paper Traveler
2. QR Code Traveler (for our QR App tutorial please see this article)

Traceability Report
Now that you’ve scheduled your Run and setup your Order, your parts will undergo a series of changes and status updates before they get to your client. To access the Traceability Report, which will let you review all of these changes from order intake all the way to shipment, get to the Run details page and click on the part for which you’d like to access the report. You can access also the Run page by clicking on Plan>Runs or by clicking on a bar in the Gantt chart to open the run details page. From there you can open the report by clicking on one of the parts listed in the Prints sections.


From here you can directly see every information related to the historical changes to the part. You can also download an offline version of the Traceability Report by clicking the Export Report.

Comments